
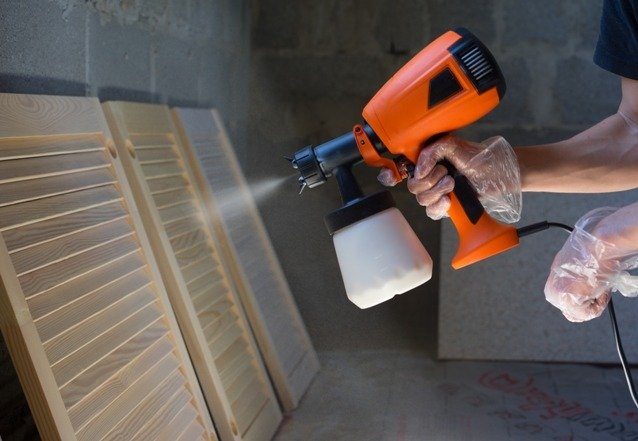
HVLP sprayer, short for high-volume low-pressure, is a type of paint sprayer that utilizes a compression mechanism to distribute the coating material.
What does this mean, though? Well, think of it this way:
To push the paint particles into the tip of the gun, this sprayer uses compressed air so that it moves the paint smoothly towards the desired direction.
Another interesting thing about HVLP paint sprayers is the fact that thanks to their compression mechanism, they do not require a high level of pressure to work. They also produce consistently finishes that are smooth and highly accurate.
The most important parts of an HVLP paint sprayer
Making use of an HVLP is not an affair one just jumps into. You have to take the time to get familiar with both the operation and its parts. Failure to do so is why many find themselves extremely frustrated with either the handling of it or the finished product of the device.
Getting familiar with the parts involved in the operation of your HVLP is a great way to start understanding how it works. We’ve listed the most important parts below:
1. Air Head
The airhead of a spray gun is one of its most important parts. It directly influences the overall quality of the outcome and also determines to a great extent the amount of paint that will be used. Also, in some designs, the mixture of air and paint occurs right here.
2. Flow Regulator
The flow regulator determines the quantity of paint that you supply through the nozzle. The flow regulator can be found right on the handle or near the trigger.
Remember; You should not restrict it too tightly.
3. Nozzle (the tip)
The nozzle/ tip is where the paint comes out of the sprayer. Almost all spray guns allow for changing the tips, as they vary according to some factors, such as the type of paint that you will use, the desired flow, and so on.
4. Compressor
Since HVLPs sprayers work predominantly with a compression mechanism, there is a need to attach the device to an air compressor.
This may sometimes cause more bulkiness than desired, but thankfully there are also portable size compressors so you’re pretty much covered.
5. Air Cap
The air cap determines the pattern of the paint. The drilled holes are made with remarkable precision and placed in such a way to ensure the most optimal pattern on the surface that you’re going to paint.
6. The fan
This part determines the width of the spray pattern. Making use of a wide fan would significantly decrease the distribution of the paint material, and vice-versa.
7. Secondary parts
Other notable features of an HVLP include secondary accessories such as filters, bombs, hose, regulators, tanks, and so on.
All these accessories play an important role in the proper tool operation, although some of their functions are highly automatic and you won’t have to get involved too often.
Starting your HVLP – Pre-Application Practices
Starting your HVLP requires some initial practice, but once you get the hang of it, the painting process becomes smooth and stress-free.
The pre-application process includes the basic prep from your side, such as choosing the right gun and nozzle, inspecting the surface you’re going to paint, getting ready with the liquid coating, ensuring that you get the right coating material for your gun, mixing in the right proportion, and so on.
Filling the gun
Filling your spray gun can be a daunting process, especially for first-timers. It is necessary to be careful and to take the time to do this step right.
Spray painting indeed is one of the fastest methods of painting, but hold your chronometers for later. Before the actual painting starts, you have to get prepared the right way, and that takes time.
Hose length
Another important pre-application practice is choosing the appropriate hose length. This step is crucial if you don’t want to make a disaster.
Using a longer than needed air hose can cause a pressure drop, which can lead to imperfections, and you surely don’t want that.
On the other hand, using a shorter than needed hose won’t let the atomizing air to cool, which increases the time it takes for paint to dry.
Spray tests
Before you begin the actual painting task, it is advisable to test the HVLP sprayer and establish the perfect spray pattern that you’re going to follow.
You can make use of any waste material for this purpose. Don’t forget to maintain a six-inch distance from the surface.
The spray tests also help you determine the most optimal settings and adjustments required for the device.
While spray testing, you’ll eventually check if your chosen pressure level is indeed perfect or it needs any adjustments.
Prepping paint area
Before you start using your sprayer, make sure to tape off sensitive areas and cover the floor areas with canvas sheets, especially if you’re going to paint indoors.
*Follow this link to my other article if you want to learn more about using a paint sprayer indoors.
If you don’t, let me tell you’re going to make a big mess. Spray-painting tends to be a very messy process.
Using your HVLP
Using your HVLP requires some steps that may seem challenging at first, but are pretty easy to pull off once you get the hang of it and you strictly follow the instructions below.
1. Turn on the device
Once you’re done setting up and putting external affairs in place, you can then go ahead and turn on your spray gun, after which you can make the adjustments below.
2 Pressure
You’ll have to set and adjust the PSI level of the device to the amount you have determined to be appropriate for whatever job you’re about to carry out, and the paint material you’re working.
It may seem a bit technical at first, but once you start learning, it becomes a lot easier and intuitive. This is where the test sprays make things easier.
It may also be helpful to note that the recommended inlet pressure by manufacturers is 30 psi to 50 psi. Going higher than this may lead to overspray. Going lower may lead to spitting.
3. Painting
Now is finally time to begin the actual painting process. Once you have done right all the above, you’ll find that the remaining process is pretty much the easiest part.
The sprayer and the compressor do most of the work here, as long as you will follow the required guidelines and precautions for application.
Tips and Guidelines on Application
Below are a few tips and tricks to get the most optimal results while working with your paint sprayers.
1. Choose the Right Tip
Spray gun tips typically come in different sizes. It is necessary to select the best tip that fits the project and the coating that you will use.
2. Secure connecting points
Your HVLP is a tool with lots of individual parts that are connected at certain points. Before you start using your sprayer, it is important to secure these connecting points until they’re stable and ready to use.
3. Always test your spray
This has been mentioned a couple of times already, but it is still worth mentioning because of its importance.
Think of yourself as an artist doing a rough sketch before the real painting; would you have skipped that part?
4. Tune your gun
You can do this by holding it perpendicular to the surface that you’re going to paint. Then, maintaining an 8-inch distance, spray a coverage without any paint runs.
Once you achieve this, you can continue painting. If not, adjust the distance or the setup, until there are no more paint runs.
Also, it is advisable to take into consideration external factors such as the surrounding temperature, humidity, and so on.
This may seem unnecessary at first, but the further you get into the job, the more you understand that these environmental factors affect not only the flow rate but also the overall finish outcome.
Maintaining your HVLP
The maintenance process of your HVLP, or any spray gun for that matter, is a little tedious, but at the same time is a highly important task that you should not overlook.
Proper maintenance determines both the durability and overall efficiency of the device over time. We’ve listed some of the most important maintenance routines below:
1. Always clean your gun after use
It is essential to clean your spray gun immediately after you finished painting. It’s much easier to clean the sprayer right after a paint job.
Next time you’re going to use it, you will thank yourself for not leaving it unclean.
There are also cleaning products for spray guns that you can use.
2. Full Reassembly
Apart from thoroughly cleaning the device immediately after use, it is important to do a routine disassembly and reassembly, perhaps every week, or when it’s about to be out of use for a while.
Safety precautions
Spray painting is not risk-free. Make sure to take all the safety measures before starting the painting job.
1. Ventilation
Coating materials contain harmful chemicals that can be especially dangerous when mixed with air. Make sure you keep windows and doors open when painting indoors to allow ventilation and to reduce exposure to paint fumes.
If you want to learn more, follow the link to read our article about spray painting indoors.
2. Safety gear
Always paint wearing proper clothing, safety goggles, and a protective mask. As mentioned above, paint particles can be dangerous.
If you take all the necessary measures for your safety, you have nothing to worry about.
3. Heat
Painting in a high-temperature environment is a terrible idea. High temperatures or direct sunlight will make the paint dry before it can bind properly, inevitably leading to cracks or peeling.
Advantages of HVLP paint sprayers
Below we’ve listed a few pros that make HVLP sprayers a favorite tool among paint professionals and amateurs alike.
1. Environmental friendly
Perhaps, one of the most important advantages of HVLPs is their ability to work without extensive oversprays.
Unlike airless paint sprayers, their conservation rate is noticeably higher, meaning there is no unreasonable paint mist to harm you and the surrounding environment.
2. Accuracy
Airless paint sprayers are indeed well-known for speeding up the painting process, but HVLPs are distinguished for their ability to produce extremely accurate and precise finishes without sacrificing the smoothness and efficiency that the spraying technology has to offer.
3. Transfer rate
Again, compared to the airless paint sprayers, HVLP sprayers boast of having a whopping transfer rate of around 80%, whereas the airless sprayers have a lower transfer rate, calculated to be about 65%.
This means you’ll be able to save up coating material and your neighbors won’t get mad at your outdoor paint jobs.
4. Price
While compared with other traditional methods of paint application, such as the brushes and rollers, HVLPs might seem a tad expensive, but when compared to airless sprayers, they are quite remarkably cheap.
Disadvantages of HVLP paint sprayers
Most shortcomings of HVLP sprayers that we could think of were not particularly limited to HVLPs alone but could be very well related to all the paint sprayers in general.
However, as HVLP sprayers are one of the most popular spray tools available today, they are still worth mentioning.
1. Maintenance and Prep Time
Sure, HVLP sprayers do save you a lot of time and are ridiculously fast when compared to traditional brushes and rollers, they can also take up a lot of time and energy for the initial preparation and maintenance practices.
However, if you’re undertaking large projects, the time it takes to get the device ready is nothing compared to the time saved.
2. Overspray
Yes, we indeed mentioned the lack of a big amount of overspray as an advantage of HVLP sprayers compared to airless paint sprayers, but at the same time, when compared to rollers or brushes, the overspray is still quite significant.
3. Less rapid
Because it operates with low pressure, an HVLP cannot operate at the same speed as an airless paint sprayer. However, it makes up for this with its increased precision. That’s what it was meant for, so we’re more than happy about it.
Conclusion
When it comes to choosing a sprayer to work with, HVLP sprayers are picked for their precision, accuracy, and safety, compared to airless sprayers that, on the other hand, are best known for their ability to finish large jobs in considerably less time.
HVLP sprayers are perfect for those valuable items that should be painted to perfection, such as tables or chairs. Grab one of them and try it yourself; you won’t be disappointed.